How to create a Blog on WordPress with SeekaHost.app (And Make Money Blogging)

If you have never created a personal blog site before now is the time to learn how to start a blog on WordPress with the free to seekahost.app blog hosting platform. The all-in-one system is one of the easiest to use platforms for bloggers to get online fast.
You will learn how to use it and more details about blogging as a career and how to make money writing blog posts.
In 2022 starting site is something anyone should consider as the digital economy is growing rapidly. The opportunities are endless to earn online.
Table of Contents
About Blogging
Blogging is the process of publishing content online in a specific niche to drive traffic to your website. You can choose any niche which interests you and start a blog on that.
Blogging business is the modern way of making money and there are many ways to make passive income through blogging. In this guide, I will show completely how to start a new blog from the scratch and make it live on the Internet.
What is a Blog?
The blog is a simple website that is built online to publish informative content, news on any given topic or niche. A blog can be started on any topic and can be built.
Also, blogs can be built using many platforms like WordPress, Drupal, etc. WordPress is the most preferred platform as it’s very user friendly and has lots of options and integrations in it.
Who can start a blog?
To start a blog, you don’t need any technical knowledge or a business degree. You just need to be more familiar with the niche in which you are starting a blog.
You do not need to have good coding knowledge to start a blogging website. You can be a business owner or freelance or student or a housewife or can be anything, starting a blog is very simple and also it’s the easiest way of making money online in the modern era.
Any specific niche to start a blog?
When it comes to choosing the niche for blogging, there are no big rules. Only main thing is that you need to choose the niche in which you are interested and have vast knowledge. Interest matters in blogging. So, if you pick a niche in which you are most interested then there are more chances that you will work consistently with more passion and succeed in it.
Hence always choose a niche in which you have more interest and knowledge rather than going for irrelevant niches which don’t fit you.
Why do you need to start a blog?
The answer is very simple, if you are planning to quit your 9 to 5 work style or if you are planning to make a passive income or if you are planning to work remotely and make money then blogging will be one of the best career options for you.
To start a new blogging website, you no need to make big investments. It’s just a matter of time which you spend building your blog matters a lot. The cost for creating a website and managing the blog for a year will be roughly around 15$ to 20$ which is not a very big deal.
Hence if you are planning to start your career in blogging, then you are in the right place. In this guide, I have shown clearly the step-by-step procedure on how to start a blogging website completely from the scratch and make it live on the internet.
I have used the SeekaHost App to register my first domain name and host the website. SeekaHost App is the best as you can create your first website within minutes by using the automated WordPress web hosting panel.
Also, SeekaHost App offers the domain name and web hosting for the best prices in the market when compared with the competitors.
Advantage of being a Blogger
Being a Blogger has tons of advantages. The first and foremost thing is that you can quit your 9 to 5 working lifestyle. Being a blogger, you can work any time and from anywhere in the world. You just need to have a good laptop with the proper internet connection to publish posts on WordPress blogs. Other than that, you are free to work anytime and from anywhere.
So this is cool, isn’t it? So don’t wait anymore, just go through this guide fully and get started with your first blog today with the SeekaHost App.
Step by Step guide to start a WordPress Blog
In this guide, I have shown how to start a new WordPress blog from the scratch. You can go through the steps mentioned below and start your own blog today with SeekaHost App.
- Choose a domain name
- Register the domain name with SeekaHost App
- Buy the WordPress hosting from SeekaHost App
- Create your website
- Update the nameservers
- Activate the SSL
- Yo-Yo – Website is Live now and Publish your first post!
Choose a domain name
This is the first step involved in starting a blog. A domain name is nothing but the name of the blogging website which you are going to create.
For example, If you take this website www.bbc.com. On this website, the domain name is bbc.com in which the domain extension is the .com
So while choosing the domain name, you should follow certain rules and make sure that you pick the right domain to succeed in your niche. Below are some of the things to which you need to give importance while choosing the domain name for your blogging website.
- Make sure that the domain name which you are choosing is relevant to your niche and resonates with the content which you are publishing. For example, if you are planning to publish sports-related content, you can choose the domain name sportsnews.com or something like that.
- You should always make sure that the domain name is as short as possible and not too long. This will help your website to perform better on Google as short domain names are always recommended.
- If you are planning to buy the expired domain, You should check the backlink profile of the expired domain and make sure that it doesn’t have any spam or bad backlinks.
- Choose the domain extension based on the country which you are planning to target. For example, if you are targeting the UK then its better to choose the .co.uk domain extension.
- For a blogging website, it’s always recommended to choose the .com as a domain extension as you can target globally.
These are some of the main things which you need to consider while choosing the domain name for your blogging website.
Register a domain name with SeekaHost.app
First of all, the reason for choosing the SeekaHost App to register the domain name is that it’s very cheap when compared to the other platforms and the domain name providers. Now, I will show you how to register the domain name.
The first thing you need to do is to visit SeekaHost App – www.seekahost.app and create an account for you on the website.
Now after creating the account, just log in to your account and search for the domain name which you are looking to register in the domain name search box which is available on the website (As shown in the below image)
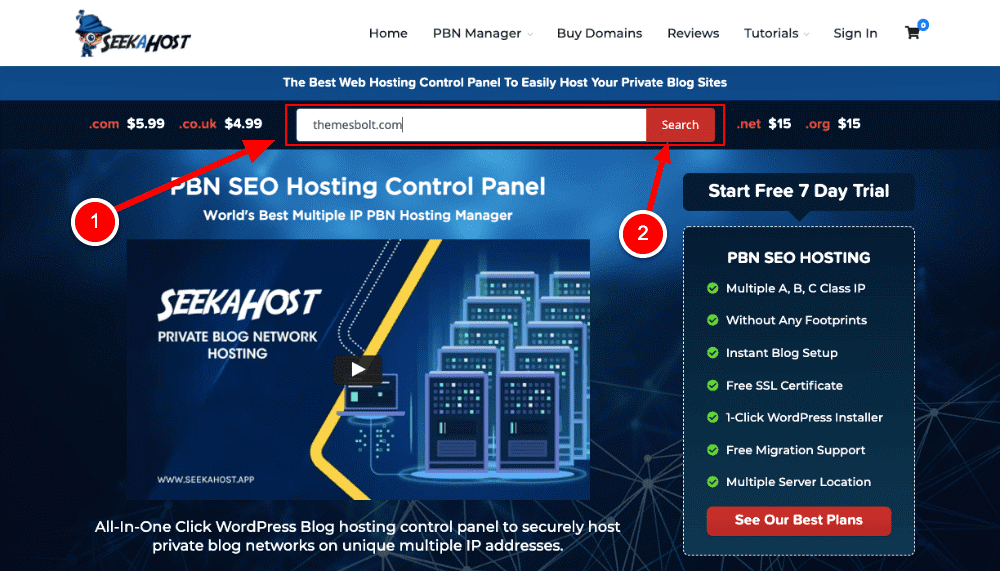
You can just enter the domain name with the extension which you are looking to buy and click on search.
If the domain name which you have entered is available then the “Available” message will be shown in the dashboard as in the below image.
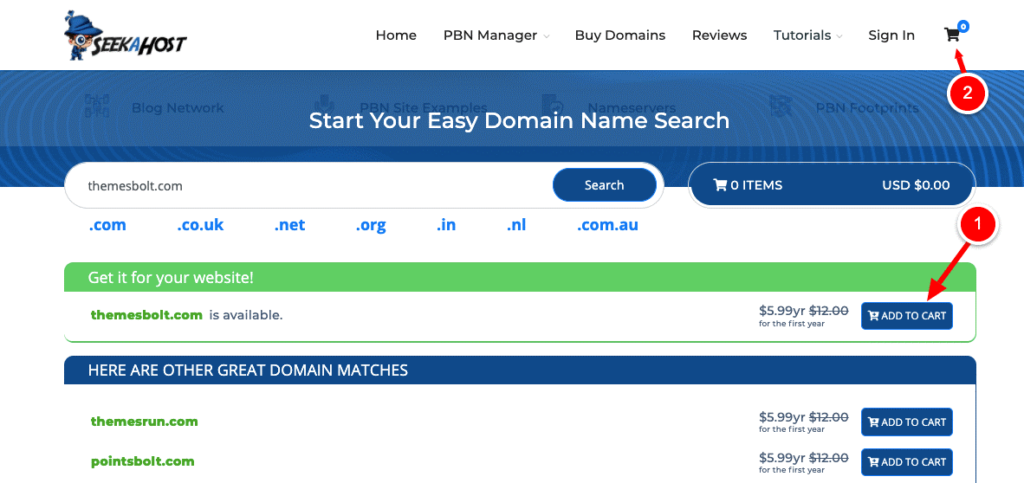
Now click on the “Add to Cart” option and in the next step just click on “Checkout” and proceed with buying the domain name.

In the next step, the SeekaHost App will prompt you to enter some basic information about you like shown in the below image. You can fill in the details and click on “Next”
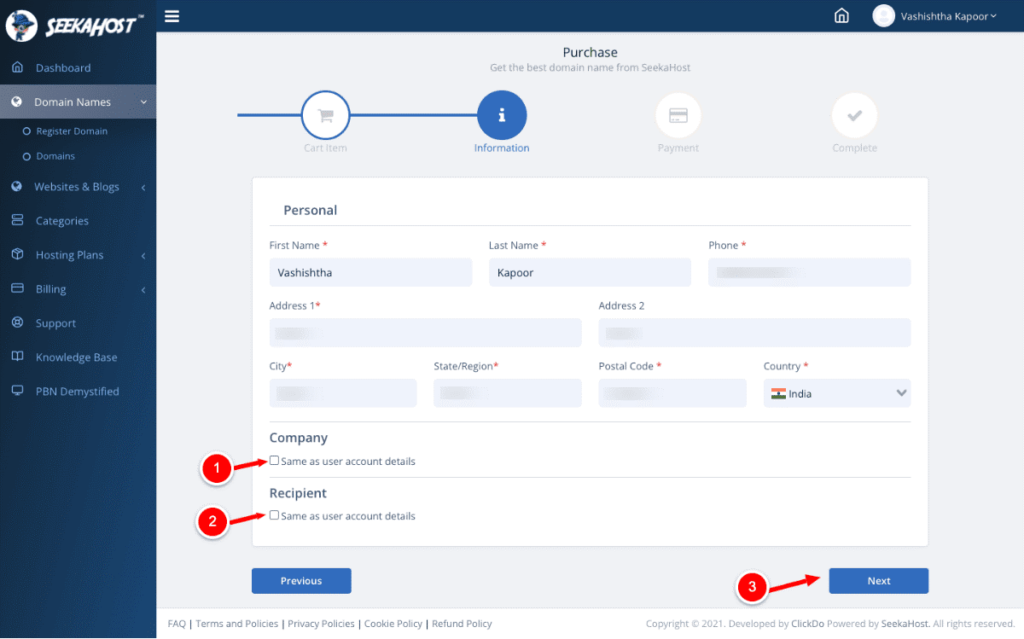
Now as shown in the below image, you can proceed with the payment option by choosing the most preferred payment methods.
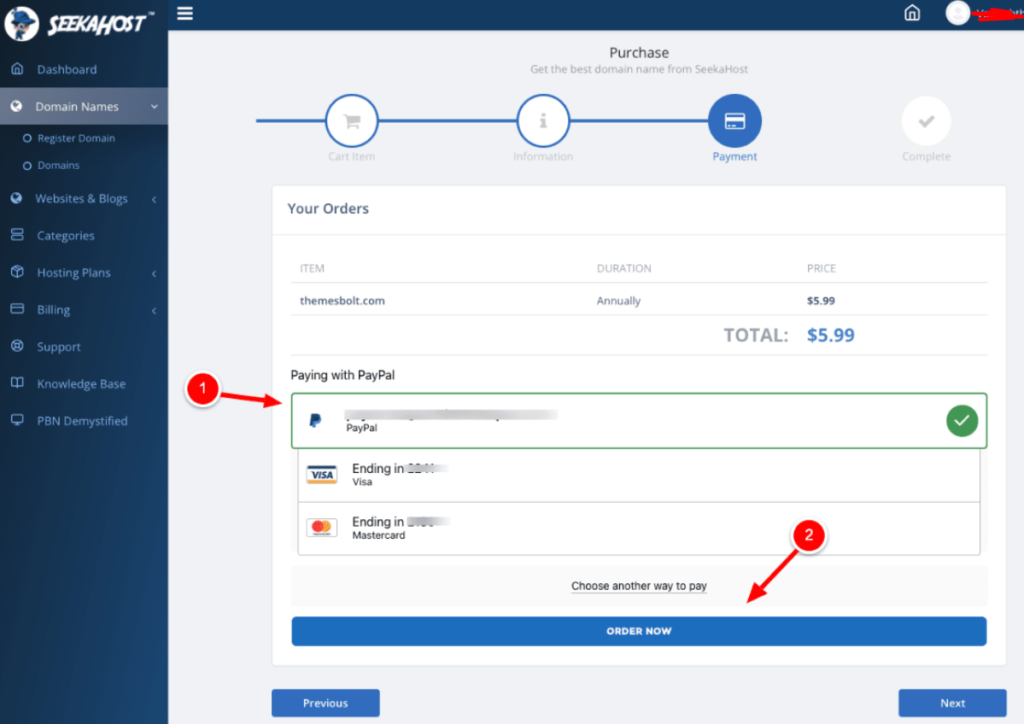
Click on “Order Now” and now your domain name will be registered for you under your account in the SeekaHost App.
Compared to the other domain name registrars in the market, SeekaHost App offers the domain names for the very best price.
Now the initial step of the domain name registration is completed. Now I will show on how to buy web hosting from SeekaHost App and add your domain to that.
Buy the WordPress hosting from SeekaHost.app
To buy WordPress hosting from SeekaHost App you need to log in to your account in the SeekaHost App and do the below.
Click on the “WordPress Hosting” under the “Hosting Plans” option as shown in the below image.
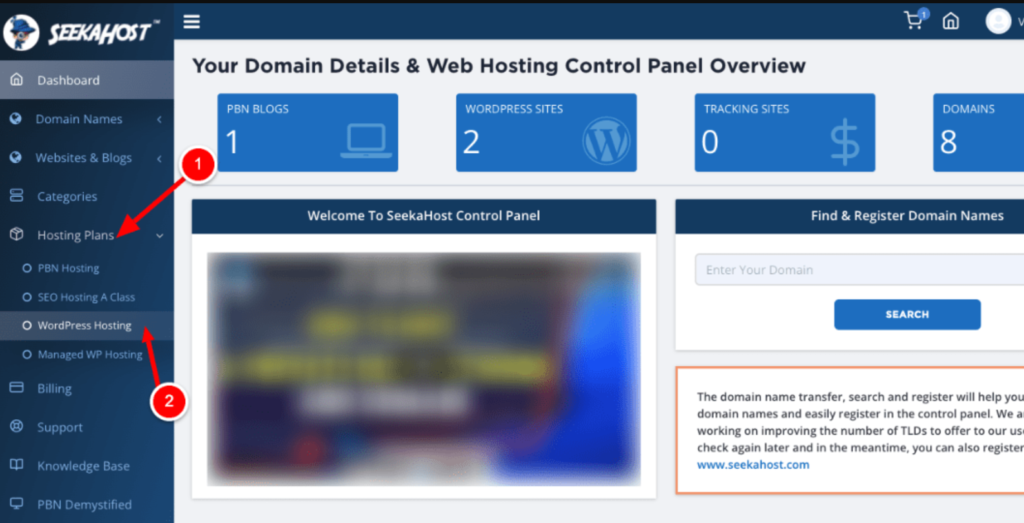
Now the list of WordPress hosting plans that the SeekaHost.app is offering will be displayed.
Even if you are hosting one website or multiple websites, SeekaHost App offers a wide range of plans to suit any kind of needs.
Since I am going to host one website now. We can proceed with selecting the one WordPress Website hosting plan as shown in the below image.
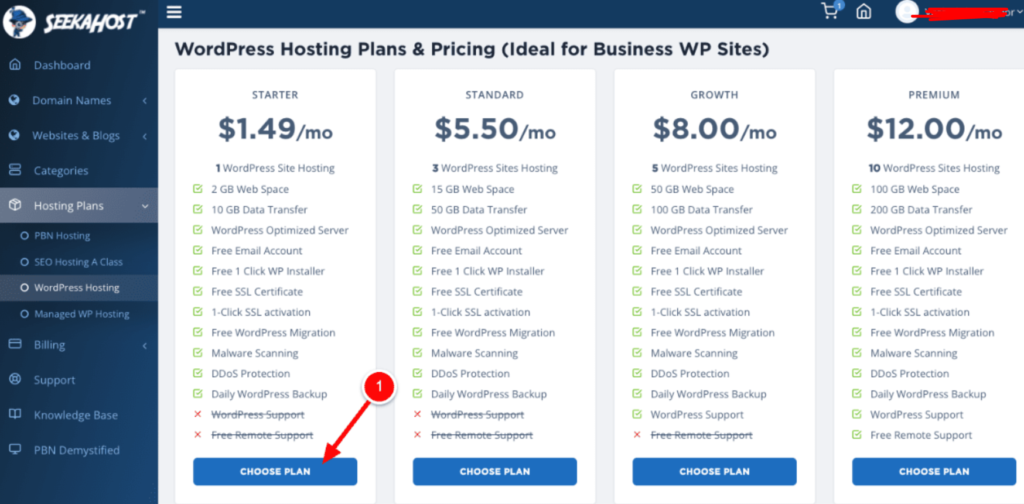
When it comes to Hosting Plans, SeekaHost App offers the best competitive prices when compared with the other hosting providers in the market.
Now click on “Choose Plan” as shown in the above image and proceed with the payment in the next step. Once the payment is processed, the hosting plan will be subscribed under your account and now ready to host your website.
Create your Blogsite on WordPress
Now you have both the domain name and the web hosting, Now in this step, I will show you how to create the website using the hosting which you have just bought.
Again login to your account on the SeekaHost App and select the “WordPress Sites” under the “Websites & Blogs” option as in the below image.
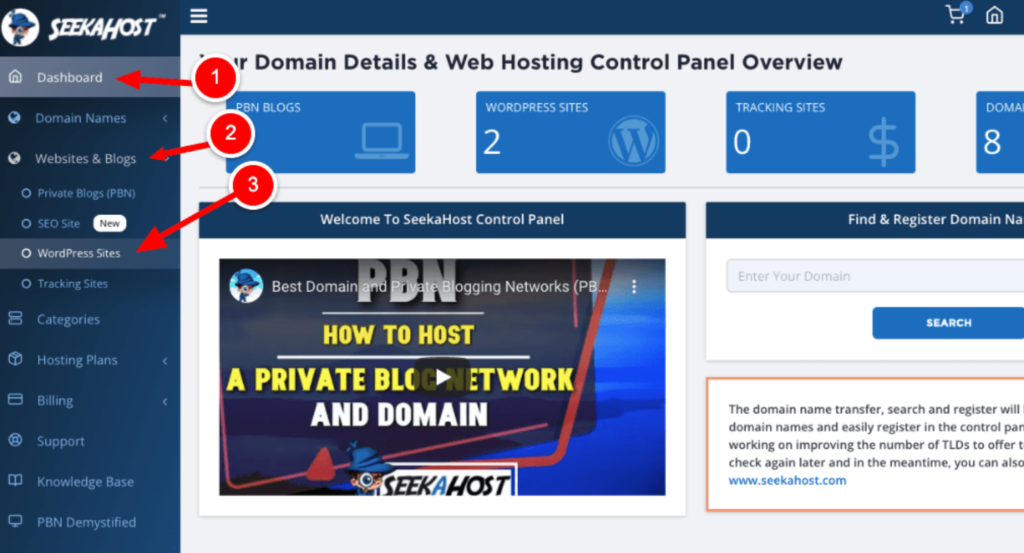
Now in the next step, select the “Create WordPress Website” option as shown in the below image and proceed further,
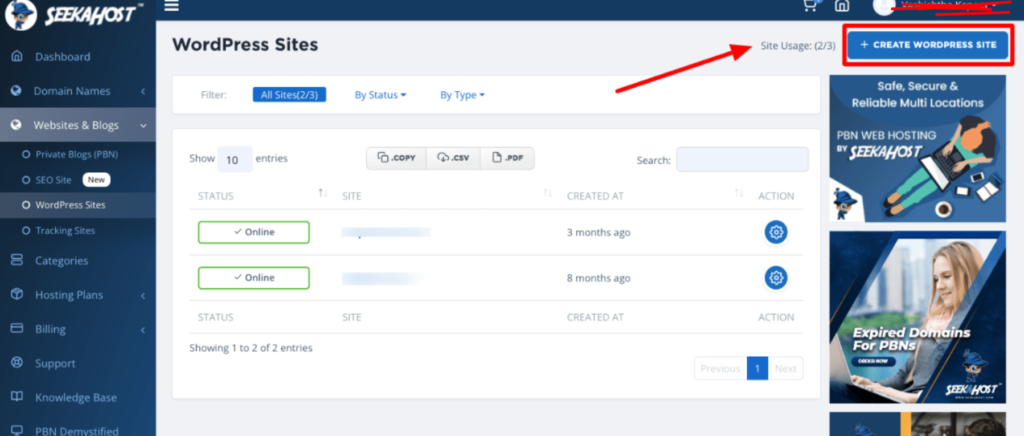
In the next step, you need to enter the website name and the domain URL in the respective fields as shown in the below image and click on “Add WordPress Site”
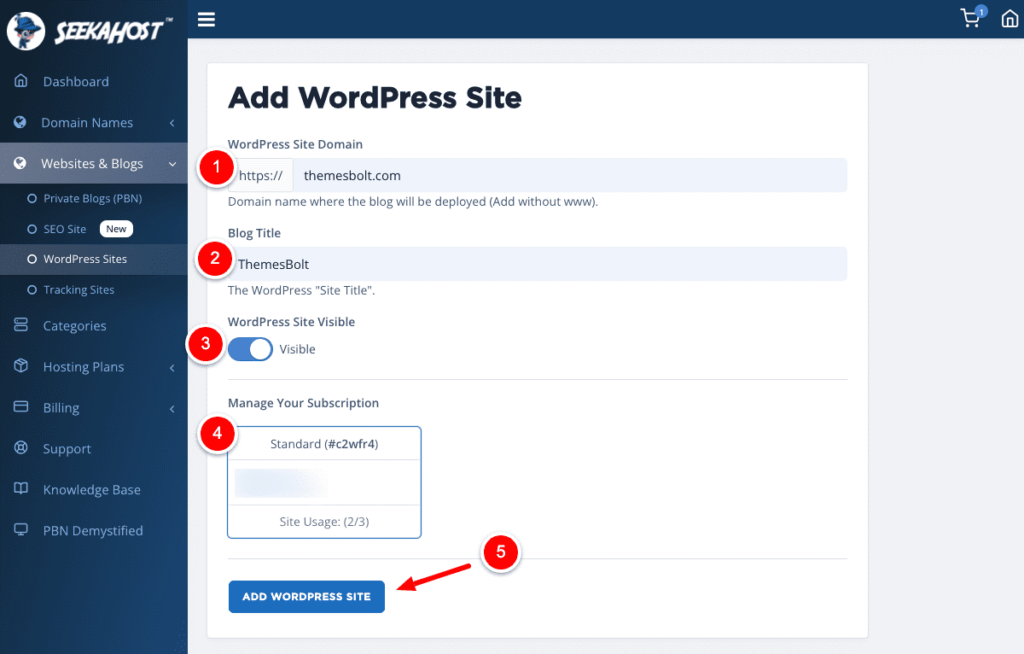
Now the process is completed and you have added the website through the web hosting which you have bought earlier.
Now WordPress will be installed to your new domain name within seconds and the login information for your website will send your registered email id from the SeekaHost App.
But the website is not live yet, to make your website live still you need to update the nameservers. Now I will show how to update the nameservers.
Update the nameservers
To make your website live on the Internet, you need to update the nameservers.
You need to point the domain name to the SeekaHost nameservers to make the site live.
Login to your account on the SeekaHost App and select the “WordPress Sites” under the “Websites & Blogs” option.
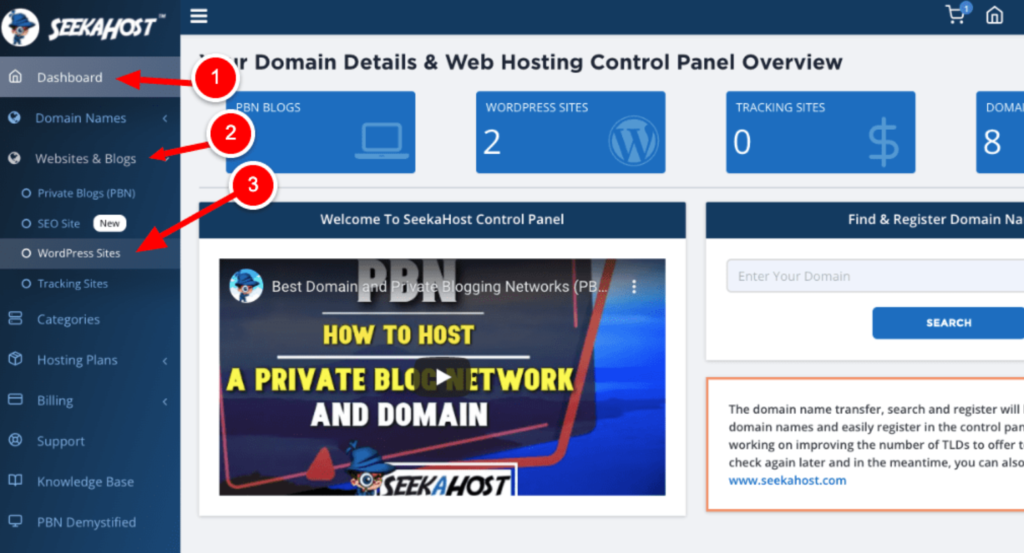
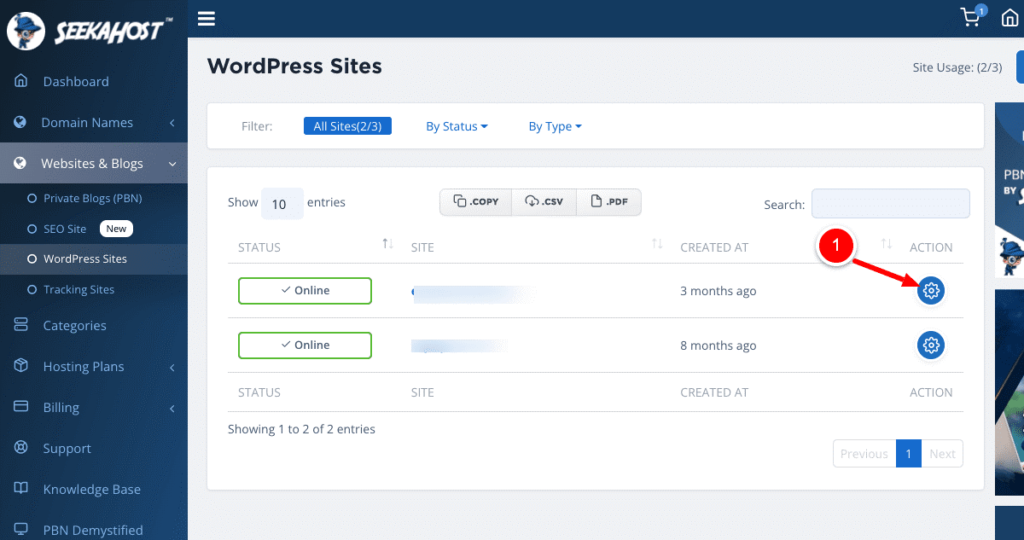
Now the list of websites which you have created will be listed.
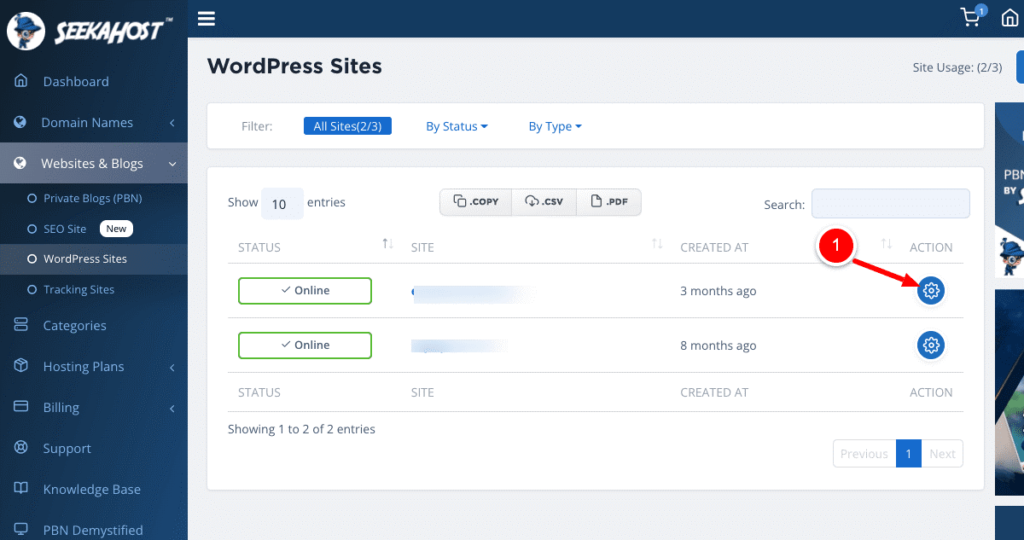
Click on the “Settings” icon near your website name as shown in the below image.
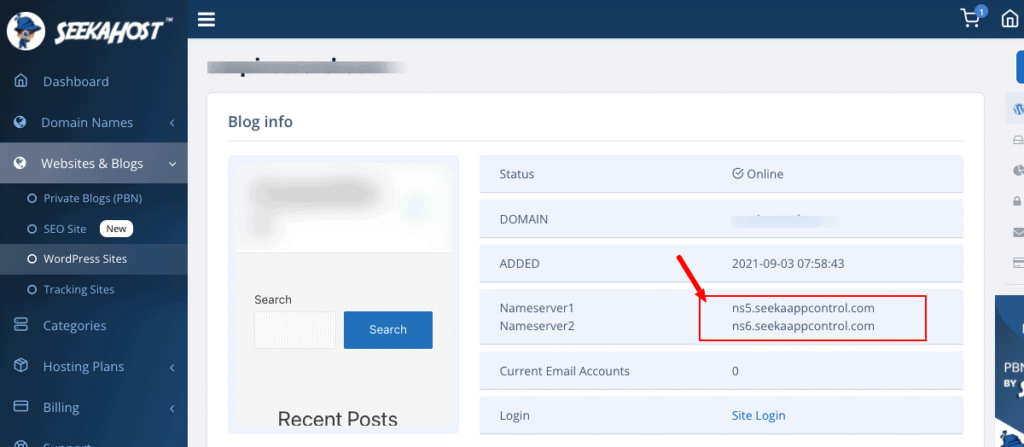
Now you can see the list of nameservers as shown in the below image. You can copy the below nameservers and you need to update it on the domain name to point them to the SeekaHost.
After copying the nameservers, You can click on the “Domains” under the “Domain Names” option as shown in the below image and click on the settings icon next to your domain name.
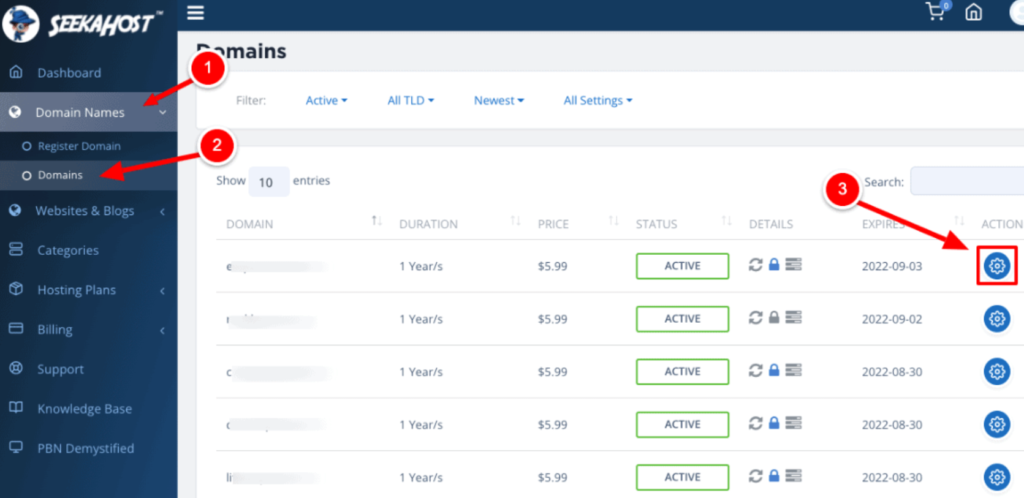
Now you will find the nameservers tab as shown in the below image.
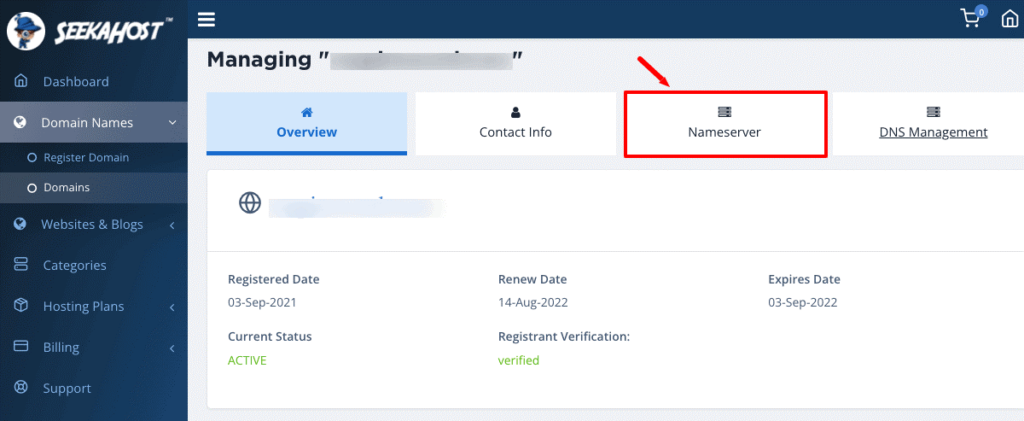
Click on the “Use Default Nameservers” option and paste the nameservers which you have copied earlier and click on the “Change Nameservers”
Now it will take a few minutes for the domain registrars to update the nameservers and after that, you can see your new website live.
So now you have registered the new domain name, bought the hosting and created the website using the SeekaHost App. Now let’s see the final step of enabling the SSL in your website.
Activate the SSL
SSL called the Secure Sockets Layer is the security layer for the website which protects mainly the communication which is happening between the user computer and the webserver.
Enabling the SSL for your website will make your website load in the HTTPS version and make the site look more secure.
Now I will show you how to activate the SSL certificate for your website using the SeekaHost App.
Click on “Websites & Blogs” select the “WordPress Sites” option and select the settings icon near your domain name as shown in the below image.
Click on the “SSL” option on the right side and just enable the option as shown in the below image.
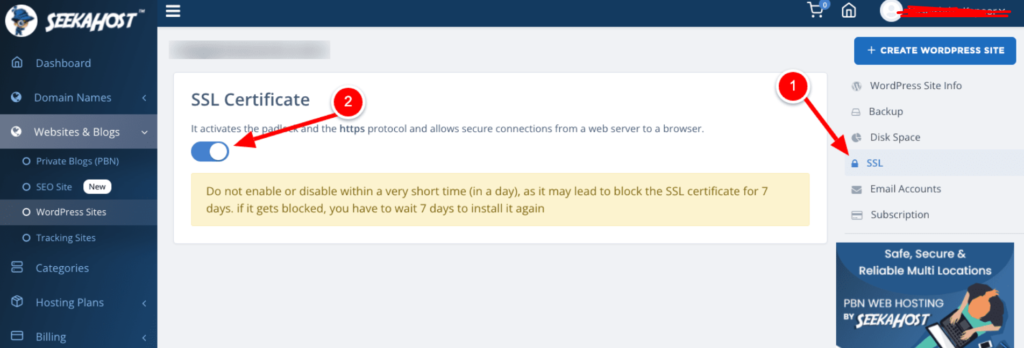
Now the SSL is activated on your website and your website will load on the HTTPS version and it’s now ready to rock the web.
Publishing the first post on your Website
Now the website is live and can be accessed by any user on the web. Now I will show you how to publish the first post on your WordPress website.
You can log in to your website by using the login details which you have received in your email from the SeekaHost App.
After logging in, you will see the WordPress dashboard which is user friendly and simple. You can click on the “Add New” under the “Posts” option.

Now you will see the text editor of WordPress as shown in the above image. This classic editor in WordPress is so simple to use and you will see the options similar to MS Word.
In the title area, you can give the desired title for your blog and in the text area, you can add normal content, media files like images, infographics, and video files.
You can also add headings, internal links, external links and much more stuff in the text editor and choose the “Publish” option which is available on the right side.
Boom….Now you have published your first post on your blogging website and your post can be now accessed by any user on the web.
How to make money from blogging?
Blogging is one of the best ways to make money online easily. Blogging business has huge potential if it’s done properly.
Blogging has lots of options to make money and some of them are affiliate marketing, website monetization via Google AdSense, selling guest posts, doing niche edits, providing banner ads and many more.
Especially if you are a student or an IT employee and if you are planning to quit your 9 to 5 job, then blogging will be one of the best career options which you can choose to quit your regular boring routing and make the way for a passive income source.
If you are a student, then you can choose blogging as the full-time career choice, and it has a huge potential that you can make more money with the strategic work plan.
The most common mistake that newbies make in blogging is not being consistent. When it comes to blogging, you need to be more consistent and put your efforts on a regular basis by publishing blogs daily on your website and keeping the users engaged. This will help you to gain authority for your website and succeed.
Hope you have learnt about starting your first blog from this guide, you can also check out https://www.seekahost.app/tutorials/ and learn more about how to make money blogging.
